How Object Detection and Instance Segmentation Work with PyTorch
Have you ever wondered how computers can identify and locate multiple objects in an image? Or how self-driving cars can distinguish between pedestrians, cars, and road signs?
Let's break down a practical PyTorch tutorial that teaches machines to detect and segment pedestrians in images.
What Are We Building?
We're creating a computer vision system that can:
- Detect pedestrians in images
- Draw boxes around them
- Create precise outlines (masks) of each person
This is known as "instance segmentation" - not only do we detect objects, but we also determine exactly which pixels belong to each object.
The Dataset: PennFudan Pedestrian Database
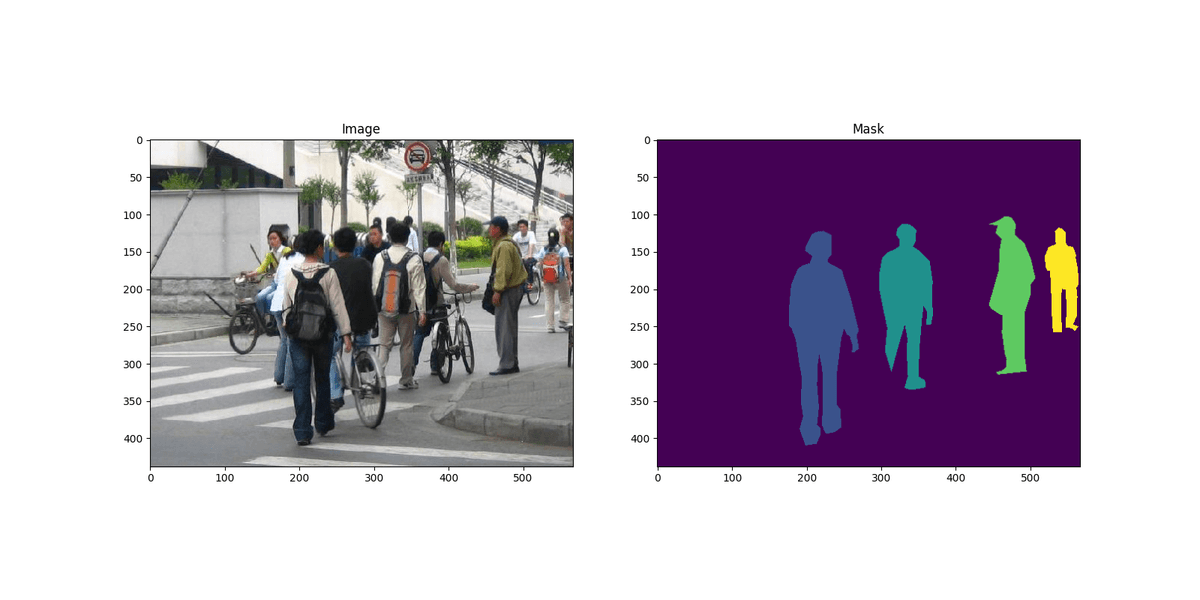
We're using a dataset from the University of Pennsylvania that contains 170 images with 345 pedestrians. What makes this dataset special is that it comes with two types of files for each image:
- The actual image with pedestrians
- A corresponding "mask" image where different colors represent different pedestrians
!wget https://www.cis.upenn.edu/~jshi/ped_html/PennFudanPed.zip -P data
!cd data && unzip PennFudanPed.zip
Understanding the Technical Approach
Let's break down what we're doing into digestible pieces:
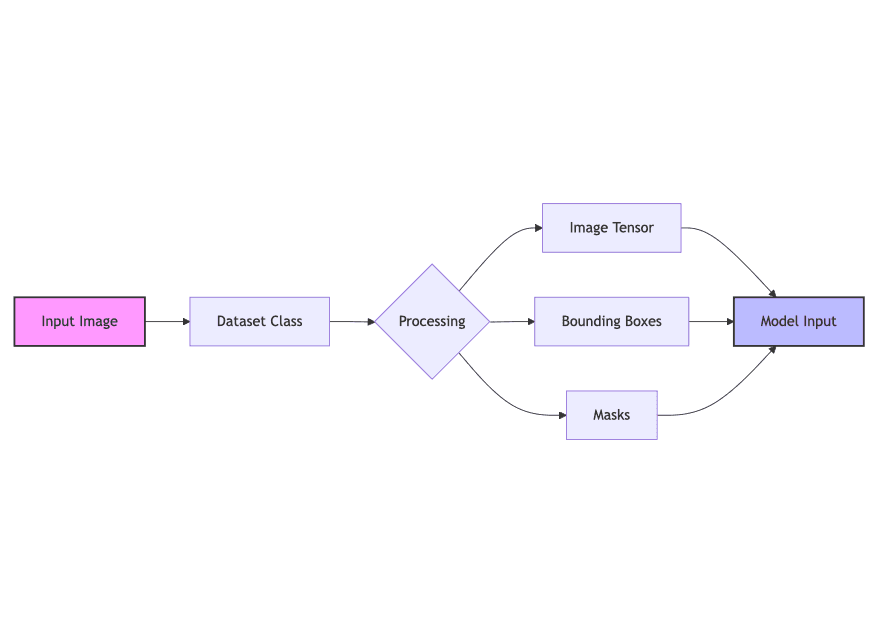
1. Creating a Custom Dataset
First, we need to organize our data in a way PyTorch can understand. Think of this like creating a filing system where each file contains:
- The original image
- Information about where each person is located (bounding boxes)
- Masks showing which pixels belong to each person
- Labels indicating what each object is (in our case, everything is a "person")
This is handled by our PennFudanDataset class, which acts like a smart filing cabinet that PyTorch can easily access.
import os
import torch

from torchvision.io import read_image
from torchvision.ops.boxes import masks_to_boxes
from torchvision import tv_tensors
from torchvision.transforms.v2 import functional as F


class PennFudanDataset(torch.utils.data.Dataset):
    def __init__(self, root, transforms):
        self.root = root
        self.transforms = transforms
        # load all image files, sorting them to
        # ensure that they are aligned
        self.imgs = list(sorted(os.listdir(os.path.join(root, "PNGImages"))))
        self.masks = list(sorted(os.listdir(os.path.join(root, "PedMasks"))))

    def __getitem__(self, idx):
        # load images and masks
        img_path = os.path.join(self.root, "PNGImages", self.imgs[idx])
        mask_path = os.path.join(self.root, "PedMasks", self.masks[idx])
        img = read_image(img_path)
        mask = read_image(mask_path)
        # instances are encoded as different colors
        obj_ids = torch.unique(mask)
        # first id is the background, so remove it
        obj_ids = obj_ids[1:]
        num_objs = len(obj_ids)

        # split the color-encoded mask into a set
        # of binary masks
        masks = (mask == obj_ids[:, None, None]).to(dtype=torch.uint8)

        # get bounding box coordinates for each mask
        boxes = masks_to_boxes(masks)

        # there is only one class
        labels = torch.ones((num_objs,), dtype=torch.int64)

        image_id = idx
        area = (boxes[:, 3] - boxes[:, 1]) * (boxes[:, 2] - boxes[:, 0])
        # suppose all instances are not crowd
        iscrowd = torch.zeros((num_objs,), dtype=torch.int64)

        # Wrap sample and targets into torchvision tv_tensors:
        img = tv_tensors.Image(img)

        target = {}
        target["boxes"] = tv_tensors.BoundingBoxes(boxes, format="XYXY", canvas_size=F.get_size(img))
        target["masks"] = tv_tensors.Mask(masks)
        target["labels"] = labels
        target["image_id"] = image_id
        target["area"] = area
        target["iscrowd"] = iscrowd

        if self.transforms is not None:
            img, target = self.transforms(img, target)

        return img, target

    def __len__(self):
        return len(self.imgs)
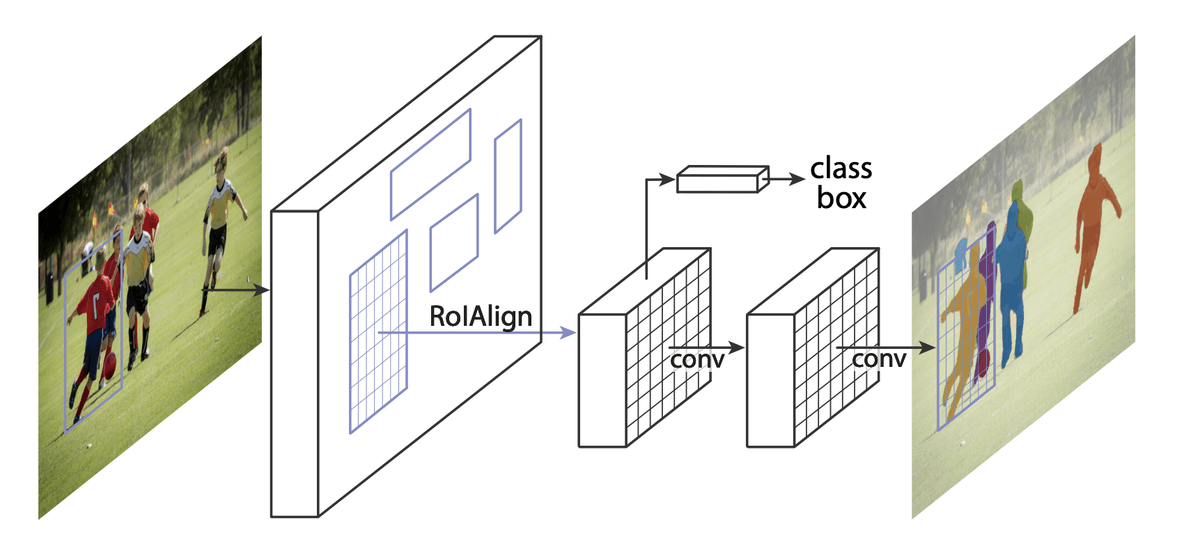
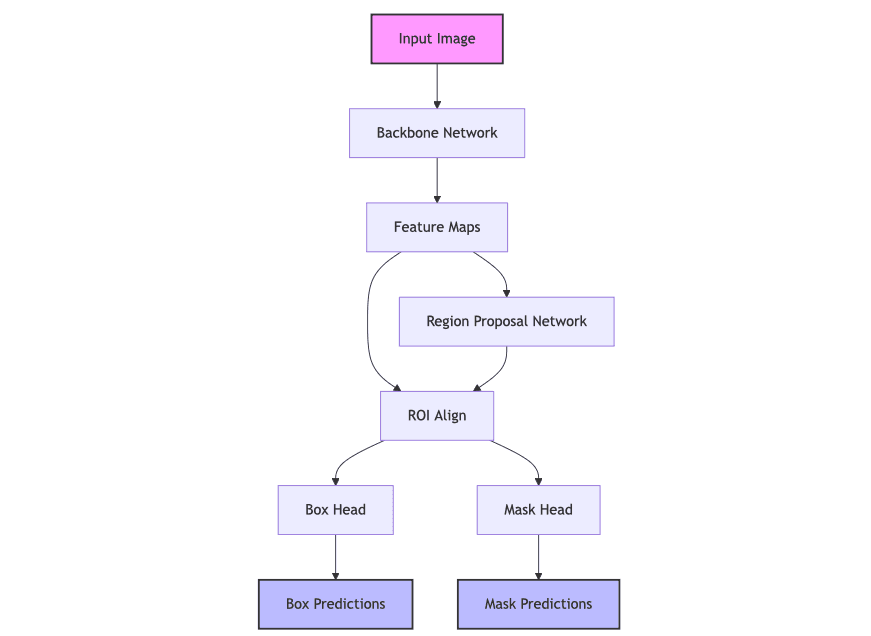
2. Choosing Our Model: Mask R-CNN
We're using a sophisticated model called Mask R-CNN, which is like a three-step processing pipeline:
- First, it looks at the entire image to find regions that might contain objects
- Then, it classifies these regions and refines the bounding boxes
- Finally, it creates detailed masks for each object it found
The brilliant part is that we're not building this from scratch. Instead, we're using a pre-trained model (trained on a much larger dataset called COCO) and adapting it for our specific need of detecting pedestrians.
3. Transfer Learning
This is where things get really interesting. Instead of training a model from scratch (which would require massive amounts of data and computing power), we're using transfer learning. It's like teaching someone who already knows how to cook Italian food how to make a specific Italian dish, rather than teaching them cooking from scratch.
We modify the final layers of the pre-trained model to:
- Adjust for our number of classes (just two: person and background)
- Fine-tune the mask prediction for our specific case of pedestrian detection
import torchvision
from torchvision.models.detection.faster_rcnn import FastRCNNPredictor

# load a model pre-trained on COCO
model = torchvision.models.detection.fasterrcnn_resnet50_fpn(weights="DEFAULT")

# replace the classifier with a new one, that has
# num_classes which is user-defined
num_classes = 2  # 1 class (person) + background
# get number of input features for the classifier
in_features = model.roi_heads.box_predictor.cls_score.in_features
# replace the pre-trained head with a new one
model.roi_heads.box_predictor = FastRCNNPredictor(in_features, num_classes)
4. Training Process
The training process involves:
- Feeding images through the model
- Comparing the model's predictions with the actual locations of pedestrians
- Adjusting the model's parameters to make better predictions next time
We use data augmentation (like randomly flipping images horizontally) to help the model learn to be more robust and generalize better to new images.
from engine import train_one_epoch, evaluate

# train on the GPU or on the CPU, if a GPU is not available
device = torch.device('cuda') if torch.cuda.is_available() else torch.device('cpu')

# our dataset has two classes only - background and person
num_classes = 2
# use our dataset and defined transformations
dataset = PennFudanDataset('data/PennFudanPed', get_transform(train=True))
dataset_test = PennFudanDataset('data/PennFudanPed', get_transform(train=False))

# split the dataset in train and test set
indices = torch.randperm(len(dataset)).tolist()
dataset = torch.utils.data.Subset(dataset, indices[:-50])
dataset_test = torch.utils.data.Subset(dataset_test, indices[-50:])

# define training and validation data loaders
data_loader = torch.utils.data.DataLoader(
    dataset,
    batch_size=2,
    shuffle=True,
    collate_fn=utils.collate_fn
)

data_loader_test = torch.utils.data.DataLoader(
    dataset_test,
    batch_size=1,
    shuffle=False,
    collate_fn=utils.collate_fn
)

# get the model using our helper function
model = get_model_instance_segmentation(num_classes)

# move model to the right device
model.to(device)

# construct an optimizer
params = [p for p in model.parameters() if p.requires_grad]
optimizer = torch.optim.SGD(
    params,
    lr=0.005,
    momentum=0.9,
    weight_decay=0.0005
)

# and a learning rate scheduler
lr_scheduler = torch.optim.lr_scheduler.StepLR(
    optimizer,
    step_size=3,
    gamma=0.1
)

# let's train it just for 2 epochs
num_epochs = 2

for epoch in range(num_epochs):
    # train for one epoch, printing every 10 iterations
    train_one_epoch(model, optimizer, data_loader, device, epoch, print_freq=10)
    # update the learning rate
    lr_scheduler.step()
    # evaluate on the test dataset
    evaluate(model, data_loader_test, device=device)

print("That's it!")
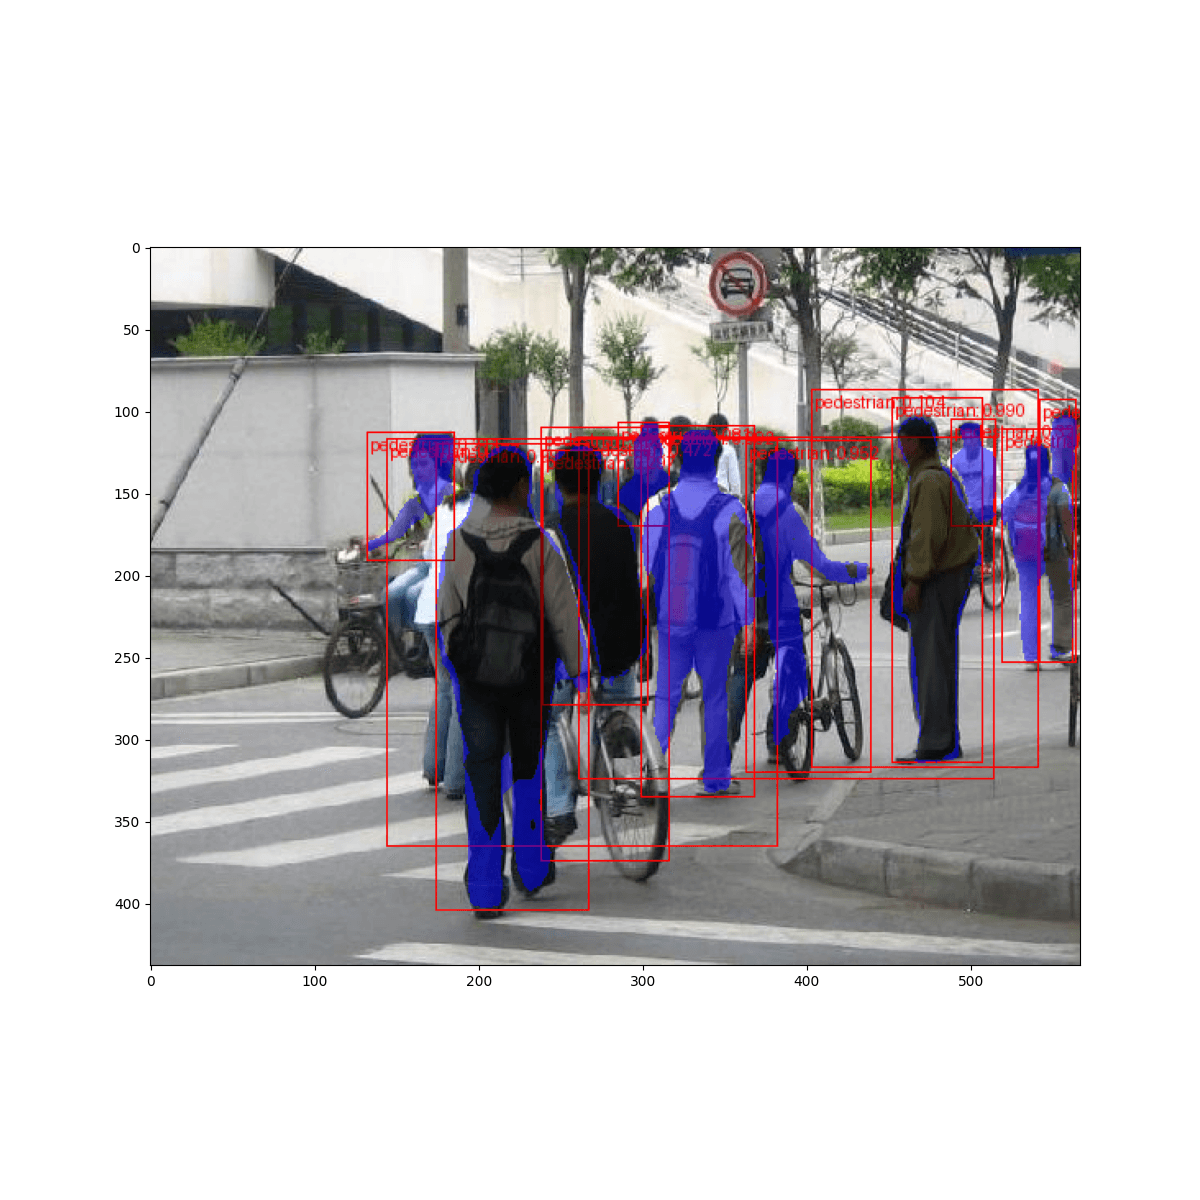
5. The Results
After training for just two epochs (two passes through our dataset), the model achieves impressive results. It can:
- Accurately locate pedestrians in new images
- Draw bounding boxes around them
- Create detailed masks showing the exact shape of each person
Real-World Applications
This has numerous real-world applications:
- Autonomous vehicles need to detect pedestrians to navigate safely
- Security systems can track people in videos
- Retail analytics can count and track customers
- Urban planning can analyze pedestrian traffic patterns
Resources
What makes this tutorial particularly valuable is how it bridges the gap between theory and practice. We're not just learning about object detection and instance segmentation in theory; we're implementing a real-world solution using industry-standard tools and techniques.
Transfer learning allows us to achieve impressive results with relatively little training data and computational resources. This makes it possible for developers and researchers to create specialized computer vision applications without needing massive datasets or expensive computing infrastructure.
You can find the official PyTorch tutorial here. And the complete code for this tutorial here